How and When to Paint and its Purpose


Painting Order and Steps
1. Ceiling
Paint away from light sources such as windows.
2. Walls
Cut in to the ceiling with a clean line. Then start in high corner, and work across and down in 1 metre square sections.
3. Windows
Mask glass if preferred. Paint window sash before frame.
4. Doors and architraves
Paint frame before door.
5. Skirting
Use a small brush and piece of cardboard or a wallpapering straight edge to keep paint off the carpet.
6. Cabinets and shelves
![]() Watch Video on How to paint a Room Step By Step Guide
Watch Video on How to paint a Room Step By Step Guide
In this order: Back wall, side walls, shelf tops and edges, shelf bottoms, inside doors, outside doors, outside cabinet and drawer fronts. The tools required will largely depend upon the condition and type of the surface being painted. Most common tools and equipment used are as below:
- Sandpaper
- Scraper
- Hot air gun
- Bucket
- Rubber gloves
- Flat filling and stripping scrapers
- Brushes -75mm is as large as you need inside
- Roller, tray and appropriate sleeves
- Paint pads and tray
- Drop sheets
- Masking tape
- Step ladder
- Trestles and planks
How to paint?
![]() Watch Video on How to paint a Wall
Watch Video on How to paint a Wall
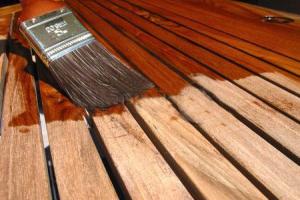
Before painting, wood siding and trim should be treated with a paintable water-repellent preservative or simple water repellent. This can be done by brush after the siding or trim is up, or by dipping before it’s installed. If you work by brush, all lap and butt joints in solid wood or all panel edges should be especially well saturated. Allow at least two warm, sunny days for adequate drying of the treatment before applying the primer paint coat. If the wood’s been dip-treated, you should let it dry even longer—about a week. Woods like red wood and cedar have water-soluble extractives that can bleed through top coats fairly easily. The best way to prevent this is to seal the wood well with an oil- base primer or a stain locking acrylic primer paint. When applying the primer, follow the application instructions provided by the manufacturer. A primer coat that is uniform in thickness will distribute the wood’s swelling stresses evenly, which helps to prevent premature paint failure.
Research has shown that the optimum thickness for the total dry paint coat (primer and two top coats) is 3.5 to 5 mils, or about the thickness of a sheet of newspaper. TWO coats of a good-quality acrylic latex house paint should be applied over the primer. In general, qualify is directly related to price. Brush application is always superior to roller or spray application, especially with the first top coat. If it isn’t practical to apply two top coats everywhere, just do it where they will be needed most—on the south and west sides of the house where the most sunlight will hit.
Areas exposed to rain wetting should also get two coats
To avoid future Separation between paint coats, the first top coat should be applied within two weeks of the prime coat, and the second top coat should be applied within two weeks of the first. Otherwise, the slick, soap like substance that can form on a recently painted surface will inhibit paint adhesion (this is especially true with primer paints). If this film is detectable, it should be scrubbed off with water and a stiff-bristled brush before you recoat. If you’re using oil-base top coats, don’t paint on a cool surface that will be heated by the sun within a few hours. This will probably cause temperature blistering. The blisters usually show up in the topmost coat anywhere from a few hours to a few days after the paint is applied. Oil-base paint may be applied at temperatures above 40°F, while latex or water-base paints re- quire application temperatures of at least 50°F. The temperature shouldn’t drop below 50°F for at least 24 hours after a latex coat is applied.
To avoid wrinkling, fading or loss of gloss, don’t apply paint at the end of a cool day
When heavy dew will form at night. Some latex paints are particularly susceptible to failure when applied under these conditions. Semi-transparent penetrating stains may be brushed, sprayed or rolled on. Again, brushing will give the best results. These stains tend to be thin, so application can be messy. And the pigment may settle in an undisturbed can, so frequent mixing is important. To prevent lap marks, always avoid stopping in the middle of a board or panel. Working in the shade will give the best results because longer drying time means greater penetration. For best results, rough sawn or weathered lumber should be treated with two coats of penetrating stain, with the second one applied before the first is dry.
In fact, if the first coat has dried completely, it may seal the wood surface temporarily so that the second coat hardly penetrates at all. About an hour after applying the second coat, use a cloth, sponge or dry brush Iightly wetted with stain to wipe off any excess stain that hasn’t penetrated into the wood. This prevents surface deposits from drying into filmy spots. Remember that sponges or cloths soaked with oil-base or alkyd.base stains are particularly susceptible to spontaneous combustion; they should be buried, immersed In water or sealed in an airtight container.
When to paint? Why to Paint?
-
To avoid cracks, fissures and air spaces.
-
To avoid weathering
-
To beautify the appearance and have durability
-
Ensure proper bond in masonry courses: The masonry walls should be built in construction lifts not exceeding 600mm.
-
Painting protects wood from Ultra-Voilet degradation and simple erosion
-
It seals into the wood the natural resins and oils
-
Retards penetration of exterior moisture into the wood surface and prevents its swelling
-
The primary function of any wood finish (paint, varnish, wax, stain, oil, etc.) is to protect the wood surface, help maintain appearance, and provide cleanability.
-
Wood surfaces exposed to the weather without any finish change color, are roughened by photo-degradation and surface checking, and erode slowly. Wood surfaces exposed indoors may change color and accumulate dirt and grease if left unprotected without some finish.
-
Wood and wood-based products in a variety of species, grain patterns, textures, and colors can be finished effectively by many different methods
Paint, however, is not a preservative; it will not prevent decay if conditions are favorable for fungal growth.